Believe it or not one thing is simpler on the Gen 2 than the Gen 1 - that is installing mesh inserts (if you dont count the difficulty in removing the side fairings that is!).
Time required; 2 hrs (not inc curing time).
I used black Sikkflex adhesive / sealant because it was open and going off. $3 cartridges of Bostick silicone sealant usually do the job for me and can take the heat (I use it to hold the home made radiator protector on my Busa). Also experience of others is that glue applied by hot glue guns reaches melting temperature when riding so should not be used.
Read this thread with the original called "Fairing - Mesh Inserts" in the How to section for tools, tips and tricks and supplies.
Here is how they look;

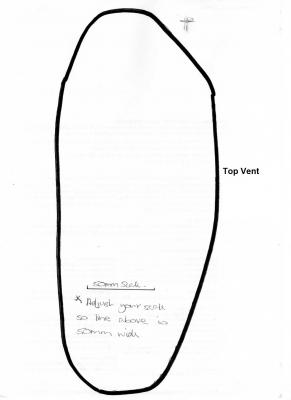
Here are the templates to rough out the cut pieces. Make sure you print these as A4 pages with the correct scale (the straight line is 50mm long). The top vent template is for the RHS. I think I reversed the bottom vent template - no biggy, just print, cut it out of the paper and check which side. Minimal trimming is required if you use the templates. A small amount of the heat foam will need to be removed from the edges. Make sure the adhesive tape that holds the foam is also removed so that the fairing plastic is exposed.
For those too busy to read the original thread (which I recommend) make sure you have all the mesh pieces facing (orientated) the same way.
Templates.


Minimal bending is needed. The mesh can be flat in the aperture and only the edges bent and glued.
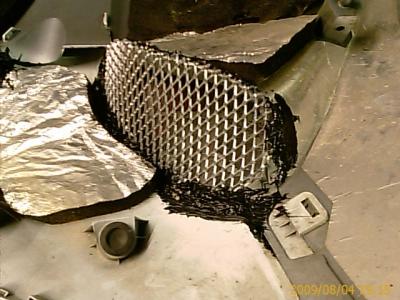
Here are pics of the gluing. I used garbage ties and skewers to fix the mesh in place while I glued and it cured - too easy!
Here gluing pics.


Here is skewer pic

Time required; 2 hrs (not inc curing time).
I used black Sikkflex adhesive / sealant because it was open and going off. $3 cartridges of Bostick silicone sealant usually do the job for me and can take the heat (I use it to hold the home made radiator protector on my Busa). Also experience of others is that glue applied by hot glue guns reaches melting temperature when riding so should not be used.
Read this thread with the original called "Fairing - Mesh Inserts" in the How to section for tools, tips and tricks and supplies.
Here is how they look;
Here are the templates to rough out the cut pieces. Make sure you print these as A4 pages with the correct scale (the straight line is 50mm long). The top vent template is for the RHS. I think I reversed the bottom vent template - no biggy, just print, cut it out of the paper and check which side. Minimal trimming is required if you use the templates. A small amount of the heat foam will need to be removed from the edges. Make sure the adhesive tape that holds the foam is also removed so that the fairing plastic is exposed.
For those too busy to read the original thread (which I recommend) make sure you have all the mesh pieces facing (orientated) the same way.
Templates.
Minimal bending is needed. The mesh can be flat in the aperture and only the edges bent and glued.
Here are pics of the gluing. I used garbage ties and skewers to fix the mesh in place while I glued and it cured - too easy!
Here gluing pics.
Here is skewer pic


