there are 6 plastic clips that hold the undertail to the rear cowling un clip them pull the undertail out and he can reach up and up clip the seat and reconnect the seat cable 20 mins max to do this if hes in sydney im sure either my self or some 1 will help him to get it sorted out
Posts: 5,303
Threads: 275
Joined: Mar 2007
Reputation:
9
05-09-2009, 12:53pm
(This post was last modified: 05-09-2009, 12:58pm by BUSGO.)
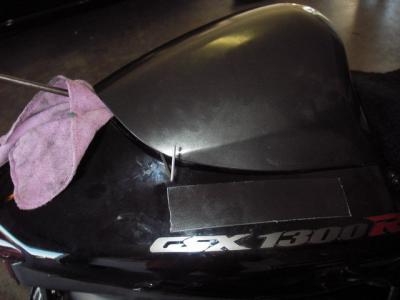
There is also an option to lift the hump slightly and poke a long thin but sturdy object through to push the latch. This is tricky but can be done.
This fix is to remove the hump but the seat might work too.
I will repost some photos that The Shredder sent me.
There used to be a topic about this before the forum upgrade but I think it may be lost.
I'm afraid this fix is only for a gen 1 busa. The gen II models have a totally different mechanism.


After getting the hump off, you can drill a hole in the rear cowling to make life easier in future.

"If time catches up with you. You're going too slow!"
Regards BUSGO
Posts: 5,823
Threads: 401
Joined: Mar 2007
Reputation:
36
Copy from old post
Just lever it up slightly on the left side, with a rag over screw driver or flat bar is better (gently does it) Have a look with torch and slip a piece of hooked wire in and pull the catch ..............it's on the rear side of the latch assembly and pulls from right to left.
Easy to do Pete and have found that now the first thing I do when I put the cover back on the bike is to hook the cable up as it's indeed so easy to forget
![[Image: Resizeofbusa005.jpg]](http://i47.photobucket.com/albums/f175/HAYABUSA-ROD/Resizeofbusa005.jpg) |
REGARDS ROD
MOBILE 0433 92 99 22
kangaroos1996@msn.com |
Thanks Busgo!
It actually has the grab rail and seat fitted so the seat might actualy have a bit more give than the hump as long as the grab rail isn't in the way. I'll get him to check out your pics and see if he's able to do it.
Cheers, mate!
Manny
Thanks guys!
I've explained it to him over the phone and given him the link to these pictures and explanations so hopefully he can sort it out.
You may have yourselves a new QLD member shortly.
Thanks again.
Cheers, Manny
Posts: 123
Threads: 6
Joined: Aug 2009
Reputation:
0
I had the same issue with the hump on. Put some race tape over the paint work, and wrap a cloth rag over a small flat blade srew driver to lever a bit of space. Using a hacksaw blade with another rag to push through, and push the release. (I just cant remember if I did it from the left or right side though ?) Took me about 5 mins, and no damage to paint was done.
Oh dude, we've all done it once. TWICE would be a different story!
Posts: 2,186
Threads: 58
Joined: Mar 2007
Reputation:
13
If your going to put a hole anywhere do it from the underneath, but with some persistance from the side should work.


![[Image: Resizeofbusa005.jpg]](http://i47.photobucket.com/albums/f175/HAYABUSA-ROD/Resizeofbusa005.jpg)


