27-07-2009, 11:18pm
Folks,
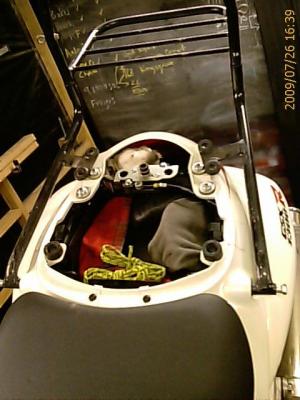
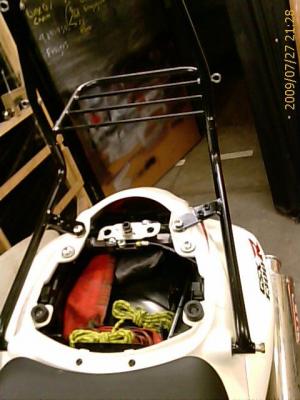
It is relatively easy to convert Gen1 ventura racks to your Gen 2. You need to extend the existing bolt tabs, either by welding or bolting extensions on the the existing tab.
Thanks to the Shredder and Steve46 for instructions on welding extensions.
Welding Conversion
To add a bit more strenght I added a triangle gusset plate where the rails turn up & the rack mounts. On the gusset plate I also welded on a 8mm ID tube with a flat washer welded on the end, from here I remove the grab rail frankenstien bolts & also bolt the rack rail at this point. This reduces the lenght of the lever action when rack is loaded. Had them re-powder coated $40. Done heaps of Ks with no problems!

Bolt on Conversion
What you need;
- 2 pieces of flat bar 80 x 40 x 4mm. I used a large angle bought from the local hardware store and cut it to size.
- 6mm and 8mm drill bits (or 10mm - I cant recall size for large bolt on ducktail.
- 6mm nuts, bolts and washers; 1 or 2 for each side.
- Paint.
- Hacksaw
- Multigrips / large pliers
- File
Time; 2 hours
1. Install your gen 1 racks on your gen 2 with the front bolts only and the bag shelf to get an idea of how the rack fits.

2. Cut the bolt holes from each of the metal protrusions.

3. Cut two pieces of flat bar using the template here. Drill the large hole and install the flat bar on the bike.

3a. Install the rack with only the two front bolts and rest the rack's protusions on top of the new flat bar.
3b. Tighten the two front rack bolts. This should automatically (centre the rack on the bike), if not centre the rack and mark original protusion's position on the flat bar.
3c. Mark the position of one or two holes on the original protusions so that you can bolt the them on to the flat bar. ( I have used two 6mm bolts each side but one will probably be enough as the weight of the rack is on the new flat bar and not the bolts).
3d. Remove the rack and drill the 6mm holes.
3e. Reinstall the rack and bolt the original protrusions onto the flat bar. You will need a pair of multigrips to "twist" the original protrusion as it is welded on a different angle to the flat bar.
3f. Mark the position of where the bolt hole should be drilled on the flat bar and also mark the flat bar where there is excess metal (this is not required if you used the template).

4. Remove the new flat bar, drill the bolt holes and remove the excess metal.
5. Reinstall the rack and bolt the original protusions and new flat bar tightly together. Check alignment.

6. Cut the 6mm bolts if they are too long. File the edges of "new" metal, paint the rack and then reinstall.

7. Here is the finished result


Note; each flat bar should have only 1 large hole for the bolt on athe ducktail and 1 or 2 6mm bolts to connect the flat bar to the original tabs. Ignore my extra holes.
It is relatively easy to convert Gen1 ventura racks to your Gen 2. You need to extend the existing bolt tabs, either by welding or bolting extensions on the the existing tab.
Thanks to the Shredder and Steve46 for instructions on welding extensions.
Welding Conversion
To add a bit more strenght I added a triangle gusset plate where the rails turn up & the rack mounts. On the gusset plate I also welded on a 8mm ID tube with a flat washer welded on the end, from here I remove the grab rail frankenstien bolts & also bolt the rack rail at this point. This reduces the lenght of the lever action when rack is loaded. Had them re-powder coated $40. Done heaps of Ks with no problems!
Bolt on Conversion
What you need;
- 2 pieces of flat bar 80 x 40 x 4mm. I used a large angle bought from the local hardware store and cut it to size.
- 6mm and 8mm drill bits (or 10mm - I cant recall size for large bolt on ducktail.
- 6mm nuts, bolts and washers; 1 or 2 for each side.
- Paint.
- Hacksaw
- Multigrips / large pliers
- File
Time; 2 hours
1. Install your gen 1 racks on your gen 2 with the front bolts only and the bag shelf to get an idea of how the rack fits.
2. Cut the bolt holes from each of the metal protrusions.
3. Cut two pieces of flat bar using the template here. Drill the large hole and install the flat bar on the bike.
3a. Install the rack with only the two front bolts and rest the rack's protusions on top of the new flat bar.
3b. Tighten the two front rack bolts. This should automatically (centre the rack on the bike), if not centre the rack and mark original protusion's position on the flat bar.
3c. Mark the position of one or two holes on the original protusions so that you can bolt the them on to the flat bar. ( I have used two 6mm bolts each side but one will probably be enough as the weight of the rack is on the new flat bar and not the bolts).
3d. Remove the rack and drill the 6mm holes.
3e. Reinstall the rack and bolt the original protrusions onto the flat bar. You will need a pair of multigrips to "twist" the original protrusion as it is welded on a different angle to the flat bar.
3f. Mark the position of where the bolt hole should be drilled on the flat bar and also mark the flat bar where there is excess metal (this is not required if you used the template).
4. Remove the new flat bar, drill the bolt holes and remove the excess metal.
5. Reinstall the rack and bolt the original protusions and new flat bar tightly together. Check alignment.
6. Cut the 6mm bolts if they are too long. File the edges of "new" metal, paint the rack and then reinstall.
7. Here is the finished result
Note; each flat bar should have only 1 large hole for the bolt on athe ducktail and 1 or 2 6mm bolts to connect the flat bar to the original tabs. Ignore my extra holes.


